Monitoring Garage Doors with IoT Sensors & the B.One Gallery – Netvox R718F vs. Sensative Strips (Part 1)
Last modified on 11th April, 2024
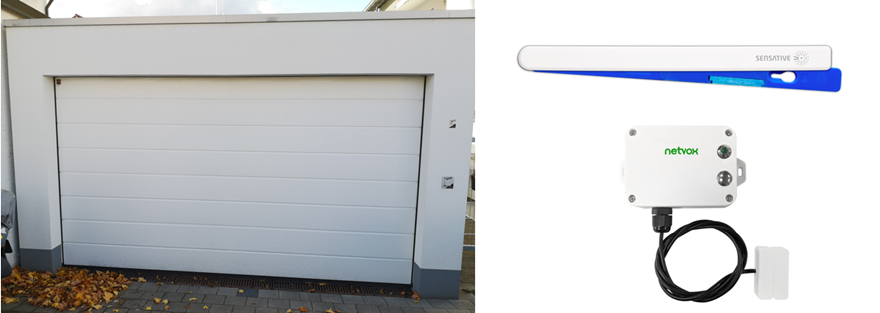
As recently announced, I would like to use the example of two LoRaWAN® sensors and the B.One Gallery visualization tool to show you how easy it is to monitor your garage or garage door using IoT. I answer the question of whether the Multi-Sensor Strips +Drip from Sensative, which is not explicitly designed for this application, is also suitable for this and draw a comparison with the Netvox R718F, which according to the manufacturer’s description can be used for this purpose, among other things.
In this first part, I will first go into why it makes sense to monitor your garage door, what you need for the implementation or what I use for it, why I use exactly these two sensors and how you specifically can install and set up the Netvox R718F. In the second part I will show you the whole thing using the Sensative Strips +Drip. And in the third part, I go into the visualization of the two sensors as well as setting up (alarm) notifications for certain status changes in the B.One Gallery and finally draw a comparative conclusion. If you are only interested in a specific part, simply click on the appropriate point in the following overview:
1. Why monitor Garage Doors with IoT/LoRaWAN®?
In principle, the motivation for monitoring a garage door using IoT sensors can of course be different for everyone and also depends on whether it takes place in a private or business environment. Nevertheless, one of the most common reasons, like mine, is better protection against theft or vandalism by alerting you to unwanted or unusual door movements (e.g. at atypical times or when you are not at home or nobody in the company is). In addition, however, potential water damage or damage caused by bad weather conditions, for example, which can occur if the door is left open, can also be avoided.
Why do I use LoRaWAN® as technology? Because this radio technology, which has become an open, global and interoperable standard for wireless communication in the Internet of Things (IoT), offers certain advantages compared to other technologies. These include the following:
- Low energy consumption of the sensors, which is why they work for several years without changing the battery = savings in costs and maintenance effort
- Radio transmission usually also through walls over several floors = robust/reliable, suitable for mixed indoor and outdoor use without an additional receiver in the garage (I can simply use my IoT gateway in the house instead)
- inexpensive and easy to expand for greater network coverage if required
- secure transmission of data through encryption with the AES128 standard (end-to-end encryption)
2. What do you need for Garage Door Monitoring with IoT/LoRaWAN®?
Basically you need the following three things:
- An IoT gateway for receiving sensor data and accessing a LoRaWAN® network. In my case, I am using the ZENNER IoT GatewayPLUS SMART with access to the LoRaWAN® network EUROPE from Minol ZENNER Connect GmbH
- A tool to be able to evaluate your data and set up appropriate notifications for critical status changes. Here I use the visualization tool B.One Gallery. You get access if you order a ZENNER IoT GatewayPLUS with the additional option ZENNER IoT PLUG&PLAY.
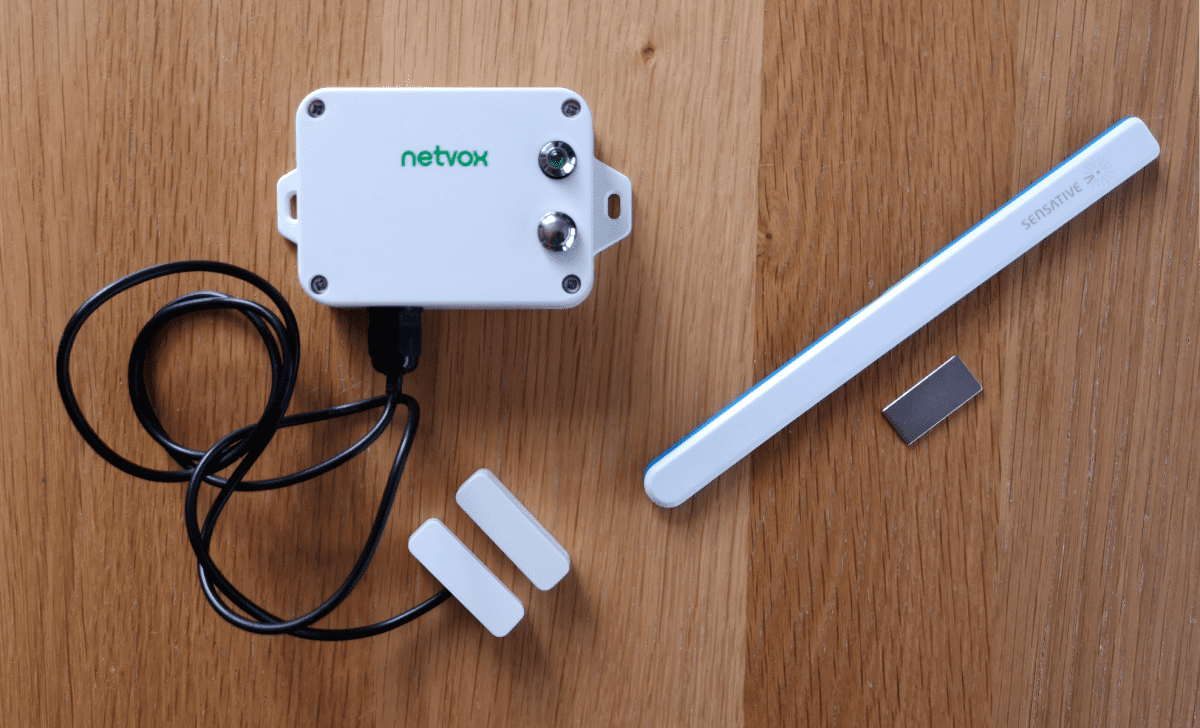
- IoT sensors for detecting the opening and closing movements of your gate, compatible with your visualization tool, in this case the B.One Gallery. For example, like me, the Netvox R718F or the Sensative Strips Multi-Sensor +Drip
3. Why Netvox R718F & Sensative Strips +Drip?
As mentioned in one of my other posts, I already use the Sensative Strips Multi-Sensor +Drip in combination with the B.One Gallery. Since this can also be used to monitor doors and windows thanks to the integrated magnetic sensor, I wanted to know whether this also applies to garage doors. But in order to have a comparison with a sensor that, according to the description, is explicitly suitable for this application of garage door monitoring and that is in a similar price range, I got the Netvox R718F Open/Close Detection Sensor. Tip: both are available in the ZENNER Shop with the practical additional option ZENNER IoT PLUG&PLAY mentioned above. This saves you the trouble of creating the sensors in the ZENNER Datahub and in the B.One Gallery and you can get started right away after installation (more on that below).
4. Monitor the Garage Door with the Netvox R718F
Let’s get to the concrete implementation with the Netvox R718F.
4.1 The Sensor & its Functions
The Netvox R718F Reed Switch Open/Close Detection Sensor (also called door and window contact sensor, which is actually not enough) is a battery-powered LoRaWAN ®-based IoT sensor, that recognizes opening and closing movements of objects and thus cannot only be used for the monitoring of factory and garage doors, doors and windows (e.g. of engine rooms, archives or public toilets), cupboards, refrigerators and freezers, cargo ship hatches, but also for tracking production/assembly lines. It doesn’t matter whether it is installed indoors or outdoors. It is therefore a device that can be used in many areas and, thanks to its attractive price range, fits into both the business and private environment.
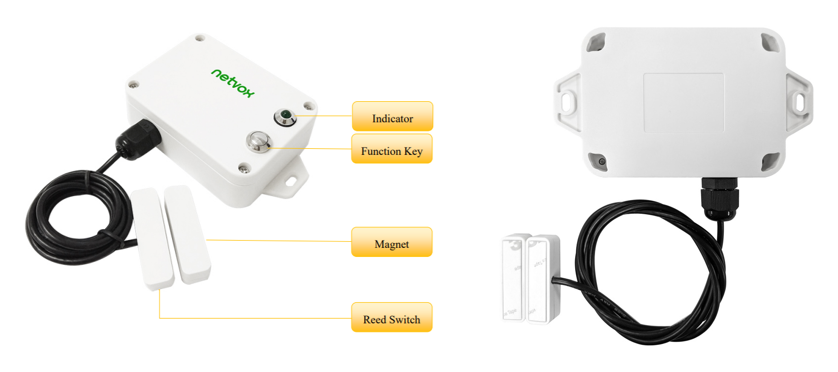
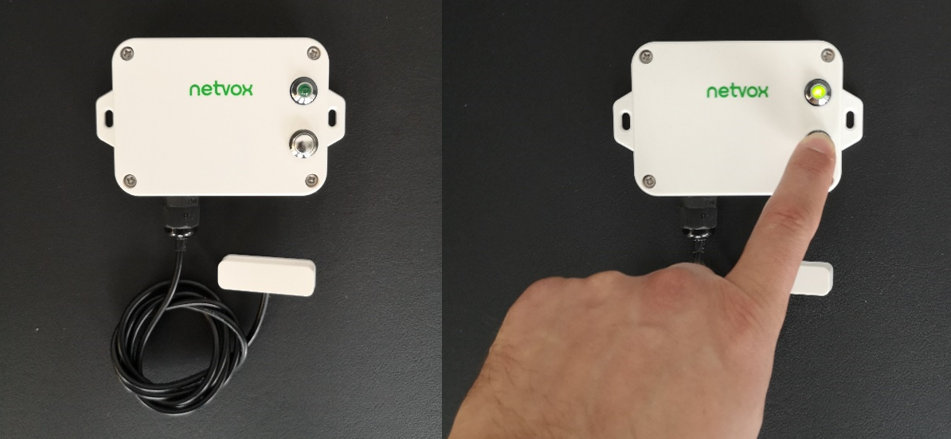
To better understand how the sensor works, a quick look at its structure. It roughly consists of the following components:
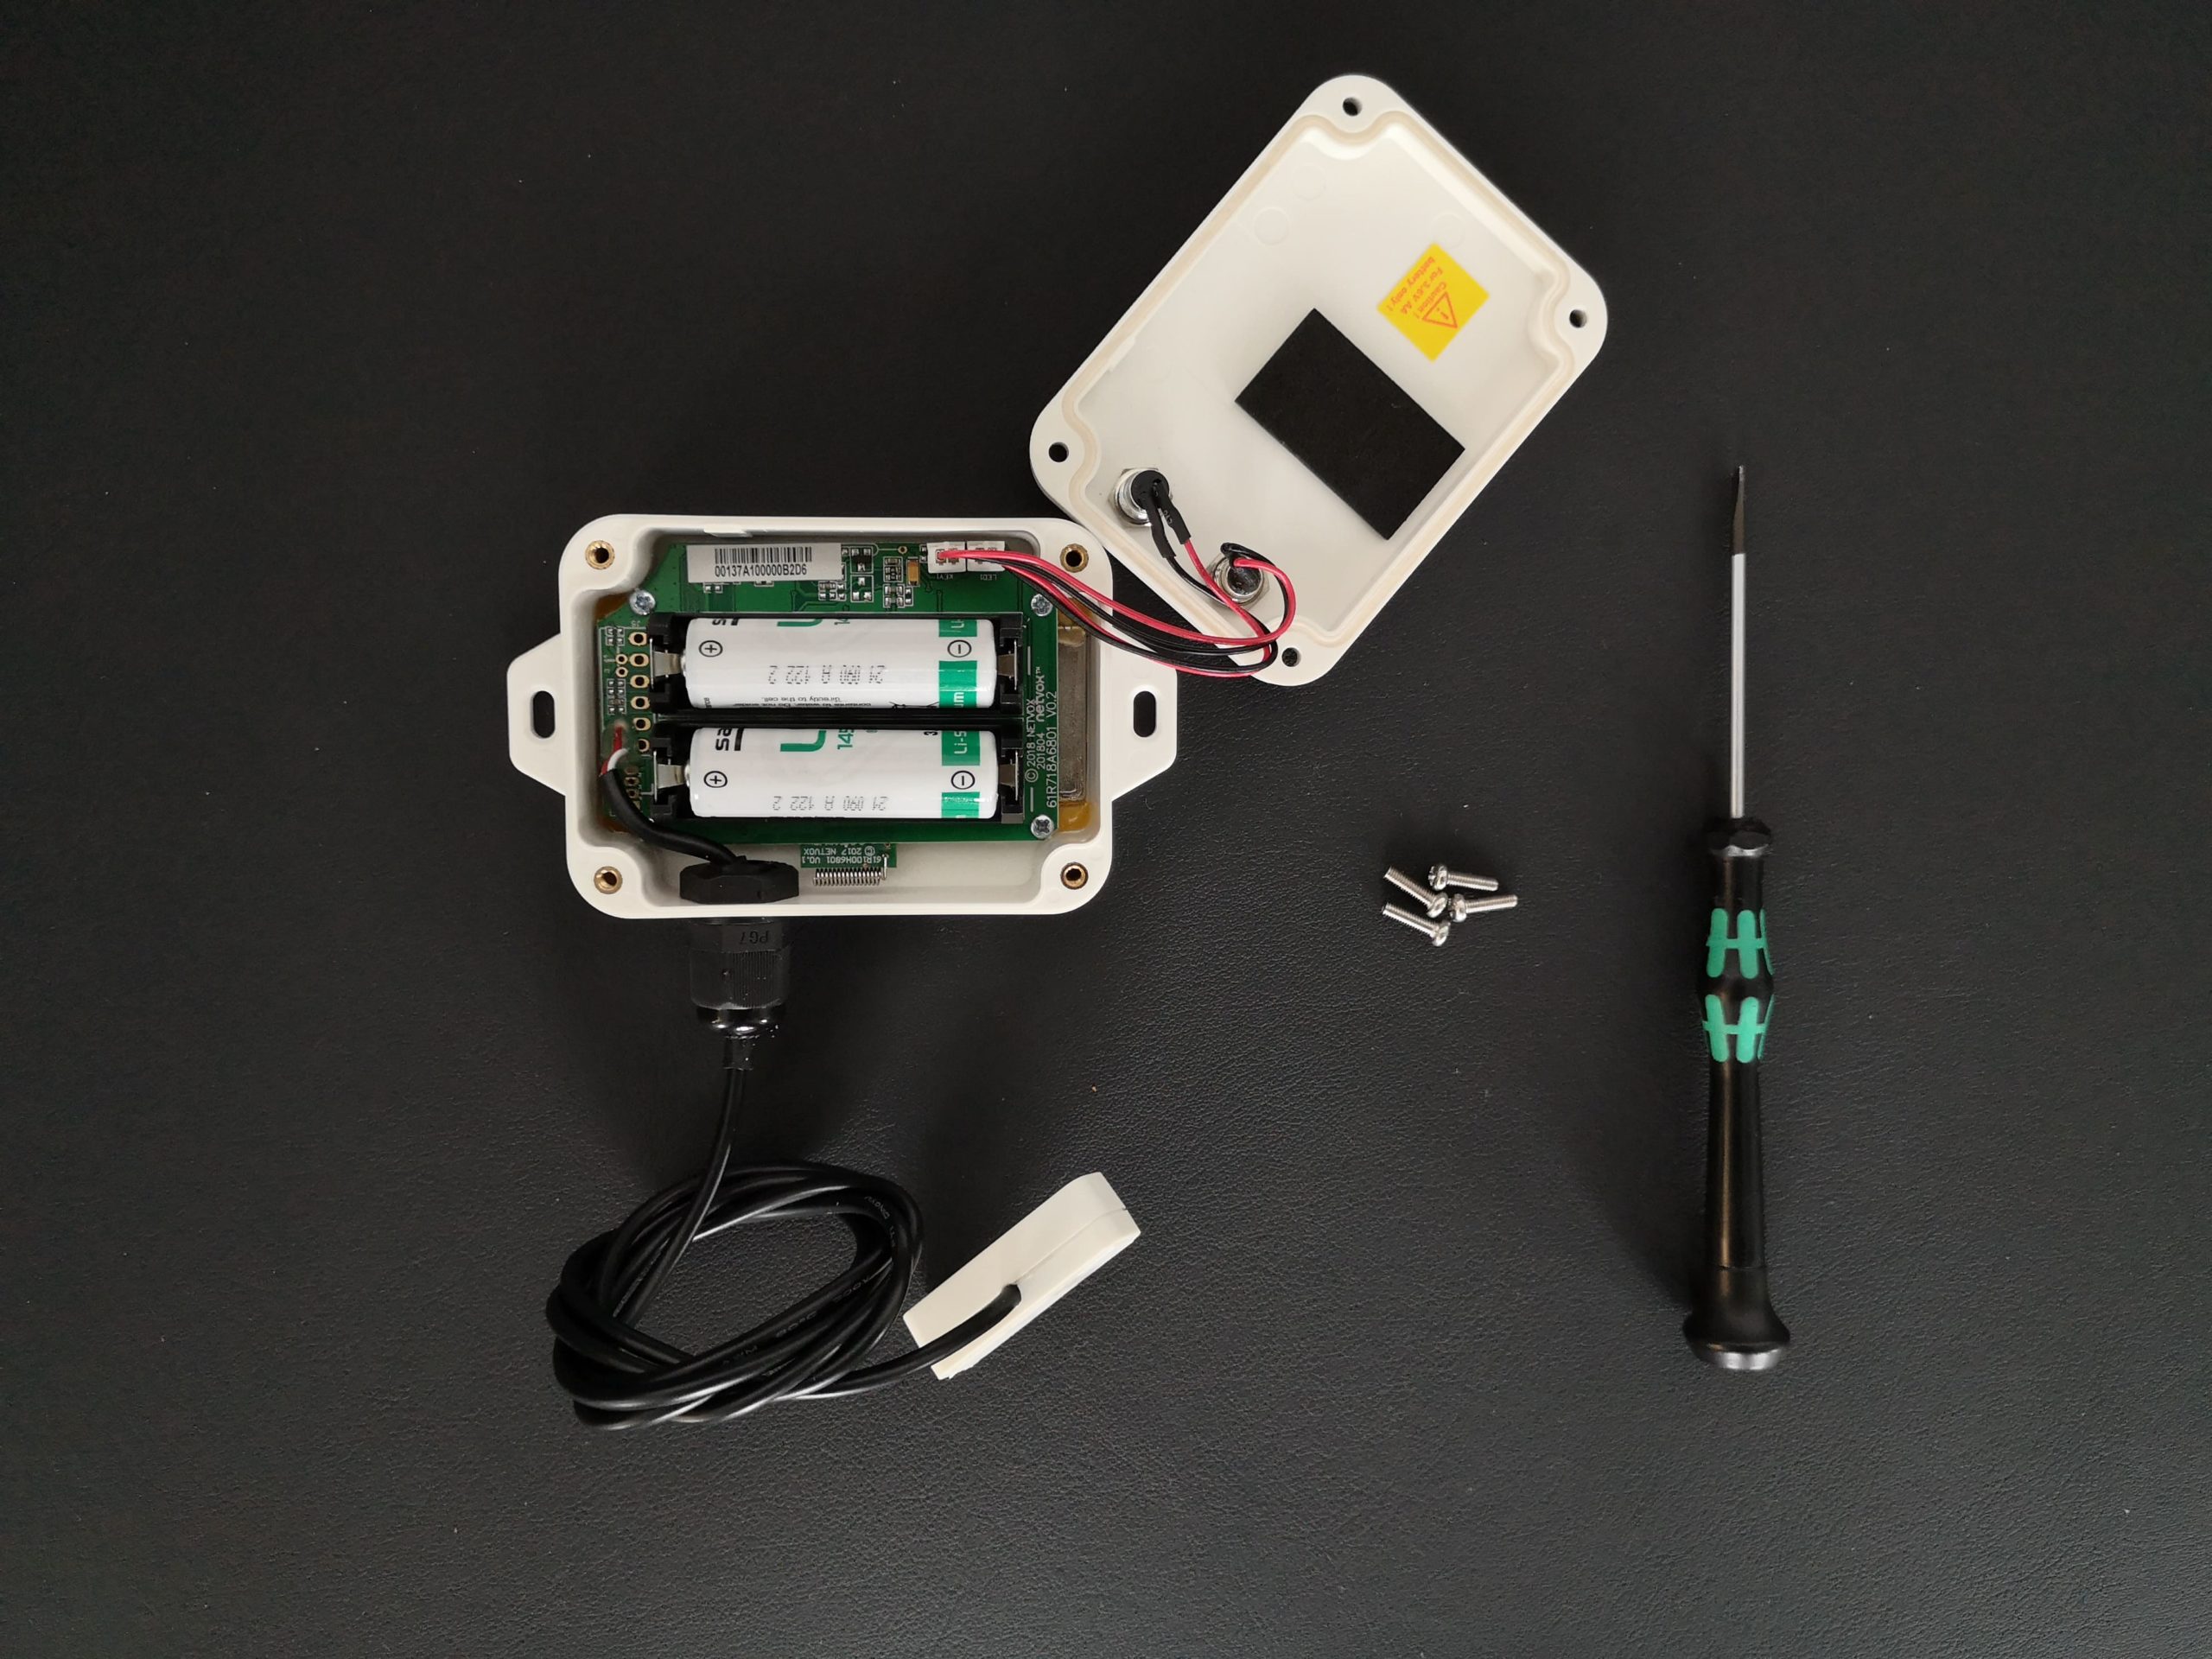
- Main body with radio module and processor for wireless transmission of data via LoRaWAN®, LED indicator light, function button for user commands (e.g. on/off) and battery compartment for 2x AA 3.6V ER14505 AA lithium batteries
- Reed switch (also called reed contact, reed switch), which is connected to the main body via a cable
- Magnet that is attached to the object to be monitored, i.e. the garage door
How exactly does the sensor detect changes in status or opening and closing movements? The so-called reed switch permanently generates (described simply) a magnetic field. If the magnet attached to the gate gets close enough to it, it changes the magnetic field and thereby actuates the so-called reed switch (also called reed contact). This is on (conducting) within the magnetic range and off (non-conducting) outside of the magnetic range. The actuation of the reed switch in turn triggers a corresponding status message, which is sent via the built-in radio module via LoRaWAN® to a gateway located in the reception area.
The exact technical specifications can be found in the data sheet if required.
4.2 Assembly & Setup/Activation
Before installing it at the destination, you first have to equip the Netvox R718F with two 3.6V AA lithium batteries (3.6V ER14505 Li-SOCl2 2400 mAh) (unfortunately not included in the scope of delivery). Important : According to the manufacturer, the batteries should not be less than 3.6 V and 2400 mAh to ensure proper functioning of the sensor. So do not use household AA batteries, which usually only have a voltage of 1.2 V.
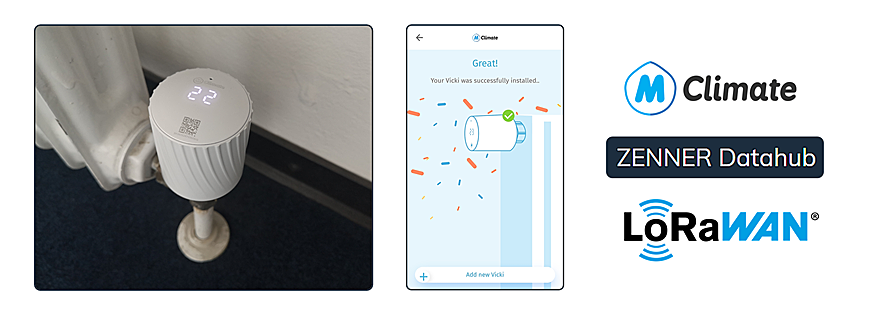
After inserting the batteries, the sensor must be made known to the network. This is done by integrating it into the ZENNER Datahub, the system/tool in which all the devices in the Minol ZENNER Connect GmbH network are managed and through which all the data passes. If you have ordered the sensor with ZENNER IoT PLUG&PLAY as described above, then dialing into the network, the so-called “join process”, starts automatically after switching on via the function button (hold for 3 seconds) and you do not have to do anything in the Datahub yourself. The sensor is then activated and ready to transmit data packets. You can tell whether the process was successful by the fact that the LED display lights up green for five seconds. However, if you ordered your Netvox R718F without IoT PLUG&PLAY, you will have to integrate it into the ZENNER Datahub yourself. You will receive the access data for the platform by email after ordering a GatewayPLUS in the ZENNER shop.
The actual assembly is then also very simple. The main housing is either hung on a metallic surface using the magnets integrated on the back, or fixed to the garage with dowels and screws using the two through holes/hangers on the left and right. Reed switches and magnets can be easily attached to the back with the 3M adhesive strip.
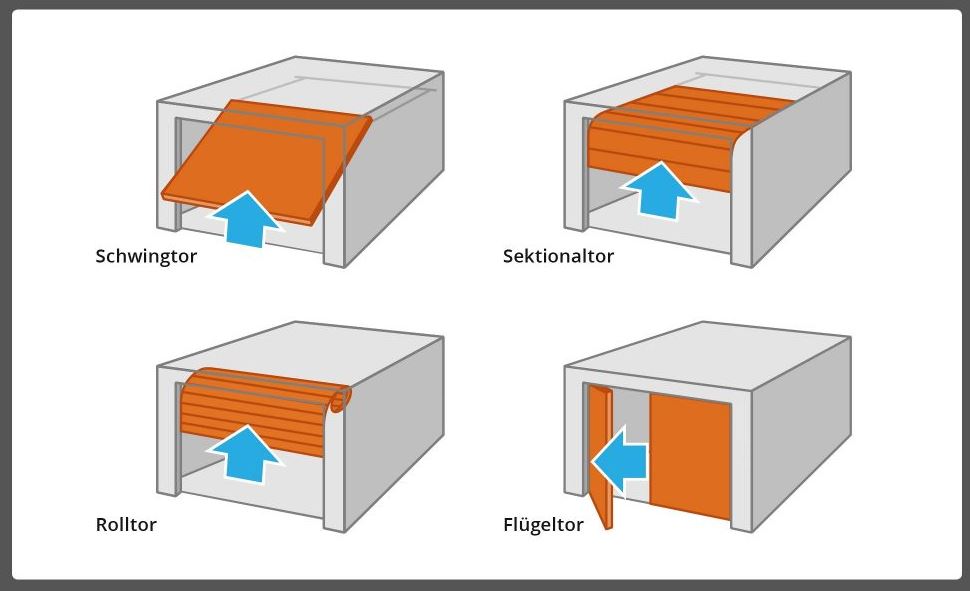
Where is the ideal installation location on the garage or on the garage door? That depends primarily on its design, but also on your personal preferences. In my case, it is a sectional door, which means that the door leaf consists of several horizontal sections, closes from top to bottom and does not roll up when opened (unlike a roller door, see the graphic below).
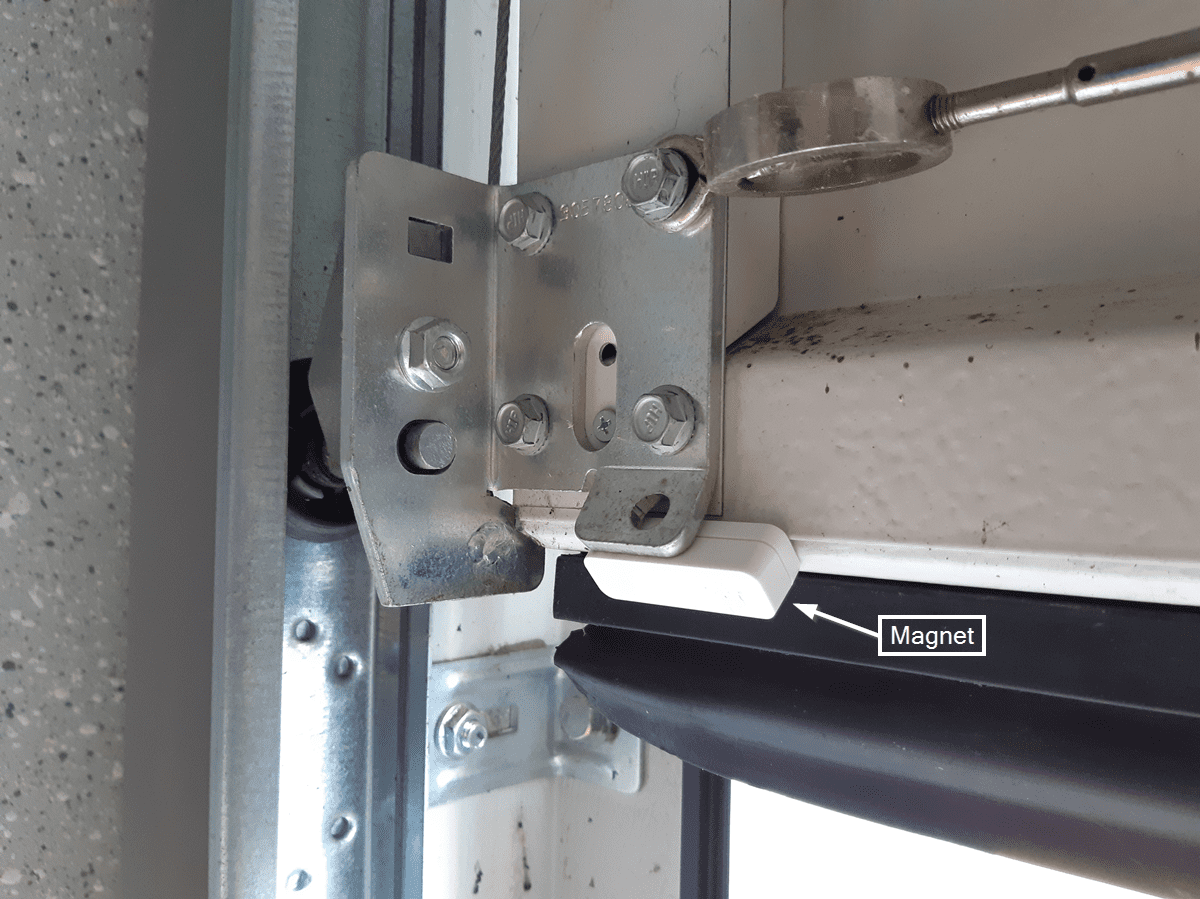
With my gate, mounting the reed switch directly on the ground at the so-called upper edge of the forecourt turned out to be suitable, among other things because the magnet could then simply be attached to a metal device on the gate and the main housing was very unobtrusively attached to the back of the gate rail by means of the magnets in the back (see photos below). The only downside I see is that the cable could be accidentally damaged. However, I’m also not very involved with potentially dangerous items in this area of the garage, so ultimately I don’t see that as a problem.
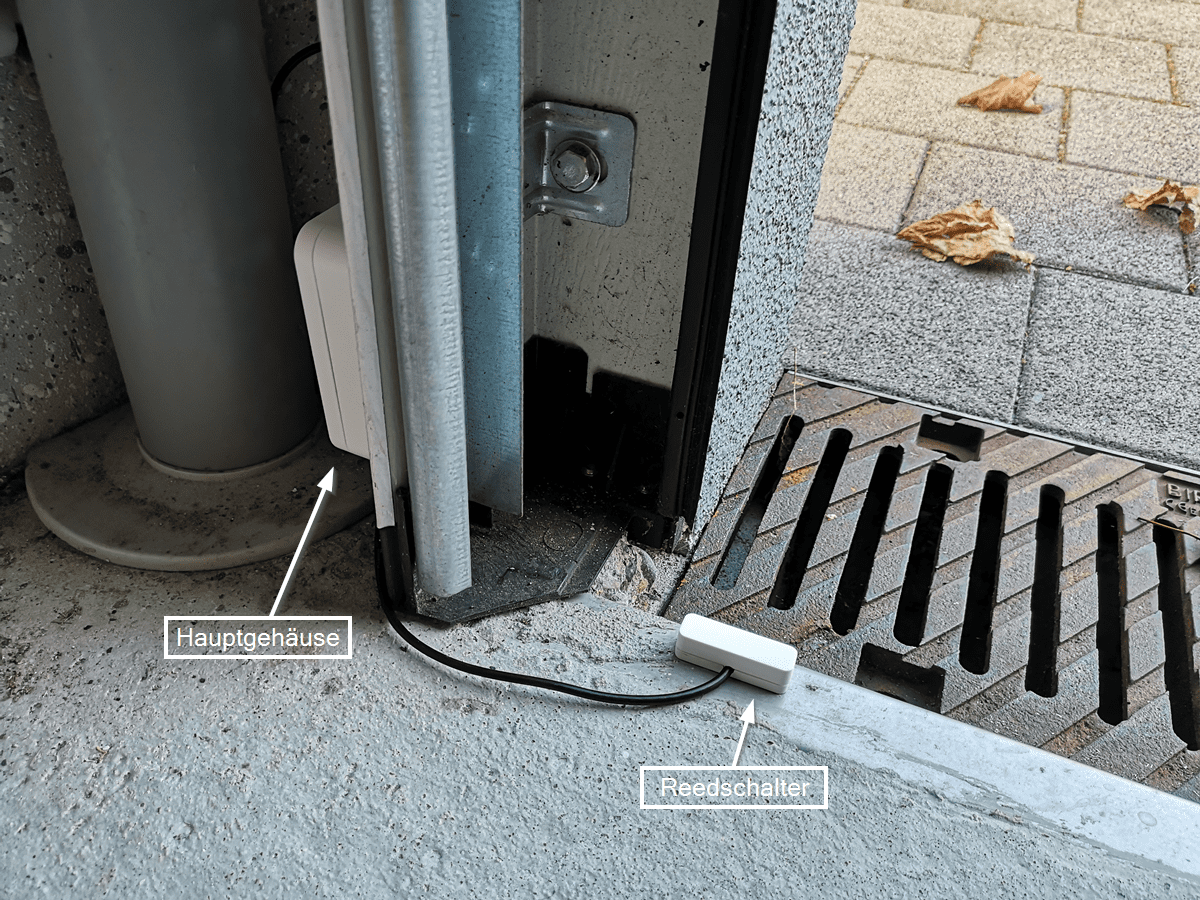
A small note: I could have placed the reed switch further to the left. However, the ground here is not level for me, so it probably doesn’t hold up so well there.
Important for assembly:
- The distance between the reed switch and magnet should be less than 2 cm when the gate is closed (although 2.5 cm was sufficient in the practical test) so that the sensor reliably detects changes/movements.
- The magnet should move along the x-axis parallel to the reed switch, NOT along the y-axis, as changing magnetic fields can falsely cause repeated state changes. However, the reed switch and magnet do not have to be 100% exactly parallel to each other, it is also sufficient if they are slightly inclined to each other (as can be seen in the photos above).
- You should not install the device in a shielded metal housing or in the vicinity of other electrical devices to avoid affecting the radio transmission.
4.3 Behavior & Configuration
As soon as the garage door is opened and the magnet and reed switch move far enough apart, the device sends an alarm message about the opening. When the garage is closed again and the magnet and reed switch approach again, the device returns to normal and sends a status message about the closing. The sensor also records and transmits data between the opening and closing movements, depending on the configuration you have stored. The default configuration looks like this:
- MaxTime: MaxInterval = 60min = 3600s –> means that the sensor sends a report with the current door status and battery status at least every 60 minutes, i.e. every hour
- MinTime: MinInterval = 60min = 3600s –> means that the current battery status is checked every 60 minutes based on the available voltage. If the “ReportableChange value” (0.1 V by default) is reached or exceeded, i.e. a change of at least 0.1 V is detected, the sensor sends a corresponding report. However, since MaxTime and MinTime match in the standard configuration, the device initially only sends at MaxTime regardless of this
- BatteryVoltageChange: 0x01 (0.1V) –> is the “ReportableChange value” just mentioned
Since the sensor is in sleep mode between the stored intervals and does not consume any energy during this time, it can (depending on the configuration) be used for an extremely long time without changing the battery. See the manual for more illustrative examples of the two intervals.
How to change the Configuration (optional):
Unfortunately, a convenient configuration of the payload via the Config app, as with the Sensative Strips sensors (see also part 2 of this series of articles), is not possible with the Netvox R718F, so you have to carry out a manual configuration. To do this, you must send a corresponding config payload as a downlink to the sensor via the ZENNER Datahub. Important: The Netvox R718F is a so-called Type A device, which means you must send a so-called “open frame” to receive the downlink. To do this, either simply open or close the door once or briefly press the function button. The LED display should then briefly light up green once. How exactly does the payload have to look like? That depends on your desired settings. You can also see in the manual how the hexadecimal payload of the Netvox R718F is generally composed. For a better understanding, we will use the information in the manual to briefly decode the standard payload, which reads as follows: 821D0E100E100100000000
82 = ReadConfig ReportReq, so this is a configuration query
1D = Device Type
0E10 = MinTime 3600s
0E10 = MaxTime 3600s
01 = Battery Change 0.1V
00000000 = reserved by the manufacturer for additional parameters
Now you know how to attach the Netvox R718F to your garage, set it up/activate it initially and optionally configure it differently. In the next post in this series (part 2) I will show you the whole thing in comparison with the Sensative Multi-Sensor Strips +Drip. And in the last post (part 3) then how the data is visualized and how notifications are set up in the B.One Gallery and what my conclusions about the two sensors are.
Do you have any questions or suggestions? Or do you already have experience with the Netvox R718F? Then I look forward to an exchange 🙂


Responses