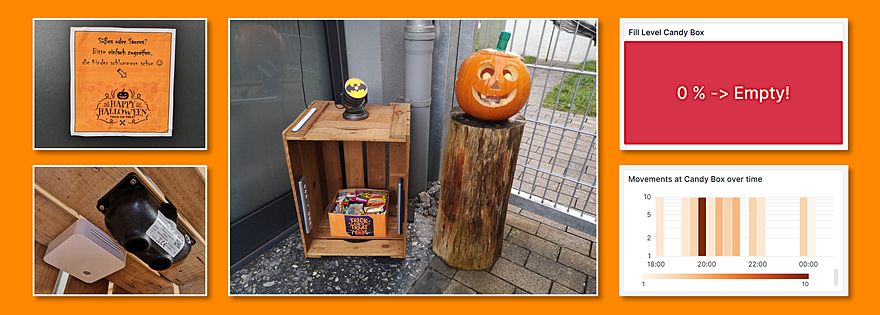
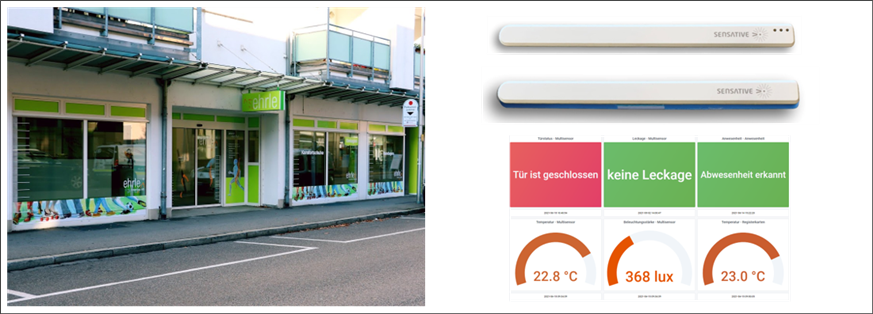
Sign in Sign up
Minol ZENNER Connect Logo
  • Sign in
  • Sign up
  • English
    • German

Category: Grafana

Grafana Howto: Setting up Alerts using Telegram as an Example

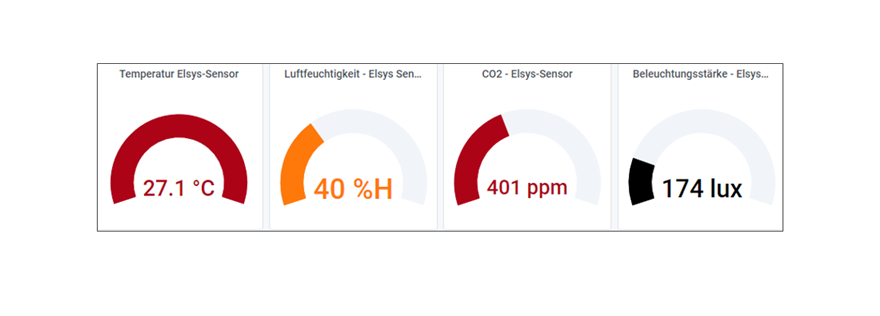
– 📖🕓 ≈  6 min – As a continuation of our small series of articles on the open source tool Grafana, we would like to show you today, using the free…

Community Admin 24. June 2021

IoT and Me 2021: Insights into my project “Smart home – feel good”

– 📖🕓 ≈  5 min – First of all, for all those who have not yet discovered my profile in the block article “IoT and Me” – Competitors introduce themselves and…
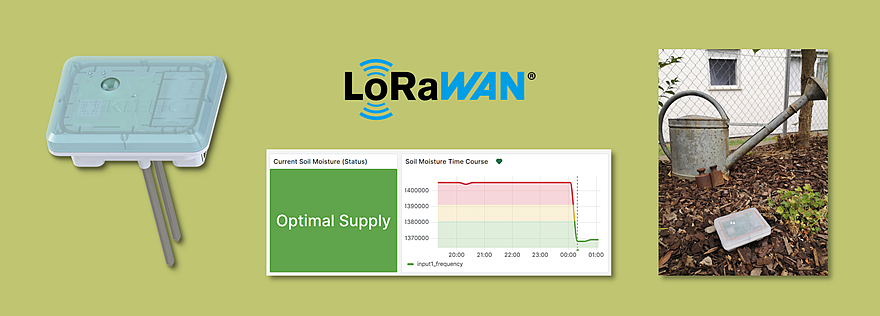
Larissa 23. June 2021
0 Comments

IoT and Me 2021 – insight into my project – heat protection in summer

– 📖🕓 ≈  3 min – Hello everyone and welcome to my blog post. For everyone who doesn’t know me yet and hasn’t read the blog article “IoT and Me” –…

Cedric 23. June 2021
0 Comments

Grafana Howto: From B.One Middleware via MQTT to InfluxDB

– 📖🕓 ≈  5 min – In the last articles you have already been given a small introduction to the open source tool Grafana. It was also reported how to install…

kirchi 21. June 2021

IoT and Me Competition 2021 – Project Start in the Ehrle Health Center

– 📖🕓 ≈  3 min – Welcome to my first blog post. For those who don’t know me, I’ll briefly introduce myself. My name is Mareica Apel, I’m 18 years old…

Mareica 16. June 2021
0 Comments

Insight into my project “IoT and Me” 2021 – refrigerator monitoring

– 📖🕓 ≈  5 min – A warm hello everyone . For those who don’t know me yet and haven’t read the blog post about the participants in the current “IoT…

MiriamOhlenroth 11. June 2021
0 Comments

Grafana Howto: Connect a Database as a Data Source

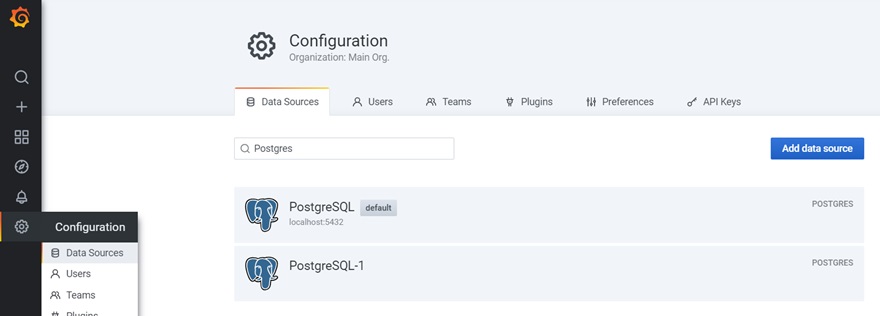
– 📖🕓 ≈  3 min – We introduced and described Grafana in the previous articles “Open Source Tool Grafana – An Introduction” and “Grafana Howto: Local Installation & Setup Using Ubuntu…

Community Admin 8. June 2021

Grafana Howto: Local Installation & Setup using Ubuntu as an Example

– 📖🕓 ≈  4 min – The article “Open Source Tool Grafana – An Introduction” has already described what kind of tool it is and what you can basically do with…

Community Admin 4. June 2021

Open Source Tool Grafana – An Introduction 

– 📖🕓 ≈  4 min – In the digital age, the monitoring and display of systems and databases, both in private and in business, are very popular and almost fundamental. Therefore…

Community Admin 27. May 2021
0 Comments

Who’s Online

Online 0
There are no users currently online

Search

Categories

Tags

Air quality Alarming B.One Community Brightness CO2 level CO2 measurement Competition Connectivity door sensor GatewayPLUS GatewayPLUS Indoor GatewayPLUS Outdoor GatewayPLUS Smart Howto indoor climate indoor climate monitoring Instructions IoTandMe IoT platform Leakage monitoring LoRaWAN LoRaWAN network Minol ZENNER Monitoring Monitoring Network Network access Opening state Open source Payload configuration PLUG&PLAY room temperature sensitive Sensitive strips Sensor technology Strips multi-sensor Temperature Temperature monitoring Tool Trainee contest Visualization tool ZENNER ZENNER CO2 indicator ZENNER IoT GatewayPLUS ZENNER Shop

Recent Posts

  • Room climate dashboard based on B.One Middleware Part 2: Technical Implementation
  • B.One Gallery Howto: Set Up & Manage Notifications
  • B.One Community Howto: Use forums for knowledge exchange
  • Interview zur Kooperation zwischen Hailo Digital Hub & Minol ZENNER Connect
  • Besserer Hochwasser-Schutz mit LoRaWAN® und der KWMSys
© 2023 - B.One Community
  • Privacy Policy
  • Imprint
  • Help
  • Terms of Use

Forum Description

As a continuation of our small series of articles on the open source tool Grafana, we would like to show you today, using the free instant messaging service Telegram as an example, how you can be notified of certain status changes from Grafana. Only three steps are necessary:
  1. Creating a Telegram bot
  2. Setting up a notification channel in Grafana
  3. Creating an alert in Grafana
You can find out exactly how this works in the following. Why telegram? Because this is probably the most popular alternative to WhatsApp and we find notifications about it to be much more convenient than via email .

Step 1: Create Telegram Bot

If you already have a Telegram account, you can search for @botfather directly in the Telegram Search and open a chat with it . Otherwise you need a free account first. Simply install the app and enter the number. You can then use Telegram not only on your smartphone, but also on your desktop via browser or desktop app . [caption id="attachment_12294" align="aligncenter" width="477"] Telegram: Open chat with @botfather[/caption] Starts a chat with @botfather and starts the process of creating a new bot using the /newbot command. You can then freely assign a name and username. The username must end with "bot" . The application will confirm successful creation. [caption id="attachment_12731" align="aligncenter" width="1033"] Telegram: Start chat with @botfather and create bot with /newbot[/caption] In order to be able to send messages via the bot later, the API token contained in the confirmation message is required. Secure this together with the name and username and protect it from access by third parties (e.g. store it in a password management tool such as KeePass). [caption id="attachment_12744" align="aligncenter" width="450"] Telegram: Confirmation with API token after successfully creating a bot[/caption] You can now add the bot you just created to an existing or newly created group. [caption id="attachment_12673" align="aligncenter" width="275"] Telegram: create a new group[/caption] [caption id="attachment_12658" align="aligncenter" width="267"] Telegram: add member to group[/caption] In addition to your bot, you also have to temporarily invite getidsbot to your group. This gives us some information, including the chat-id relevant to us. [caption id="attachment_12665" align="aligncenter" width="350"] Telegram: Request chat-id via GetIDs Bot[/caption] [caption id="attachment_12669" align="aligncenter" width="350"] Telegram: message with chat-id after adding GetIDs bot[/caption] This chat ID must also be saved. You then remove getidsbot from the group. As an alternative to a group, you can also use a channel by adding a user/bot as admin to it. The advantage of this variant is that some additional third-party systems can be connected more easily. However, certain conditions must also be met for this. However, to explain this in detail would go beyond the scope of this article.

Step 2: Set up "Notification Channel" in Grafana

After you have created a Telegram bot in the first step, you must now, if you have not already done so, set up a so-called "Notification channel" in Grafana. In this you have to deposit the access data generated in the previous step once. Various alerts can then be assigned to the channel. To do this, select the following menu item: Alerting/Notification channels [caption id="attachment_12300" align="aligncenter" width="243"] Grafana: Alerting/Notification channels menu item[/caption] After clicking on " New Channel " you can freely assign a name for this notification channel in the view that opens. Good to know at this point: If several use the same Grafana instance, everyone within them can see the notification channels of the other users. In this case, we recommend a particularly meaningful and clear name for your channel. After selecting "Telegram" as type you have to insert the API-token and the chat-id from step 1. The test button s can be used to check whether everything is stored correctly - if everything is correct, a test message appears in the Telegram channel. [caption id="attachment_12677" align="aligncenter" width="650"] Grafana: Configure new notification channel[/caption] [caption id="attachment_12681" align="aligncenter" width="493"] Telegram: Alerting test message from Grafana[/caption] The notification channel is then saved using the save button.

Step 3: Create an Alert in Grafana

We would now like to issue an alert via the notification channel we have just created when a defined status occurs. In this example we would like to be informed when the door status of our Strips Multi-Sensor reports that the door has been opened or closed again. For this we need the appropriate panel from our time course dashboard, in this case "Door Status - Multisensor". A little tip: Unfortunately, alerts cannot be set up in dashboards/panels with only current values. This only works in dashboards/panels with time history values. [caption id="attachment_12306" align="aligncenter" width="1303"] Grafana: Panel in the dashboard with visualized door status[/caption] In the diagram, an open door is represented as "0", a closed door as "1". This state should now be monitored using our alarm: If the status is less than 1, we would like to be alarmed (door open), if it is greater than 0 or 1, an all-clear should be sent. [caption id="attachment_12308" align="aligncenter" width="382"] Grafana: Value mappings for door status[/caption] To store the alarm, first click on the panel name as shown in the screenshot above and then select "Edit" from the drop-down menu. The following steps must be carried out there (see screenshot below):
  1. Switch to the "Alert" tab and select "Create Alert".
  2. Set the frequency to check for an alarm condition. In our case every 10 seconds.
  3. Duration of how long the alarm condition should exist before being informed. We want to be alerted immediately, hence 0.
  4. Define/set conditions for sending/triggering an alarm, with various options. such as min, max, avg (average). In this case, we check the highest value in the queried time range, hence max().
  5. The opposite of 2). If we check every 10s, we need to look at the time range from 10s ago to now. The "A" in front of it stands for the name of the referenced query.
  6. Choosing the desired mathematical operator such as greater than, less than, between, etc. Since we want to check if the value is less than 1, we choose "is below".
  7. Specification of the threshold value to be checked . In this case 1.
  8. Define the behavior of the alarm if there is no data in the requested period: we want to keep the current state, hence "Keep Last State".
  9. Assignment of the notification channel set up in step 2.
[caption id="attachment_12309" align="aligncenter" width="820"] Grafana: Set up an alert in the dashboard[/caption] Now the sample alert is fully configured and you just have to click on " Save " in the top right corner. [caption id="attachment_12310" align="alignleft" width="294"] Grafana: save changes in dashboard (alert).[/caption] Similar to this procedure, a large number of other alerts can be set up for a wide variety of states. More detailed information and examples can also be found in various Internet forums. In addition to Telegram, other services are also available for setting up alarm notifications, such as email , Google Hangouts, HipChat, LINE, Microsoft Teams, Slack or webhook. Have you already set up alerts in Grafana yourself? If yes, which service do you use and why? Or which service would you like another article on? Off to the comments with it ;-)

COOKIES:

In order to provide you with the best possible user experience and offer, we use cookies on our website that are not only technically necessary but also serve to analyse access. By clicking on 'Accept all' you agree to this. You can find more detailed information and how to revoke your consent at any time in our Privacy Policy. (Decline)
Cookie settingsAccept all
Einwilligung erneut aufrufen

Your Cookie Consent

Our website uses cookies to help us improve our website and provide you with the best possible service. These cookies are necessary and cannot be disabled. We also use cookies to analyse the traffic on our website. By clicking on 'Accept', you agree to our cookie policy:
Essential
Always Enabled
Essential cookies enable basic functions and are necessary for the proper functionality of the website.
Statistics
Statistics cookies collect information anonymously. This information helps us understand how our visitors use our website.
SAVE & ACCEPT