B.One Gallery Howto: Set Up & Manage Notifications
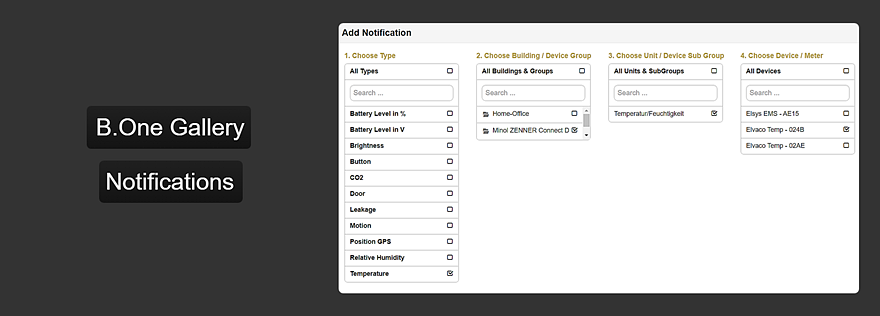
– 📖🕓 ≈ 4 min – Updated on 01/12/2023 Like me, you already use the B.One Gallery visualization platform in combination with a compatible GPS tracker and would like to receive…
– 📖🕓 ≈ 6 min – Article last updated: 01/31/2022 After I get you in Part 1 and Part 2 of this series of posts showed what you can do about…
– 📖🕓 ≈ 5 min – In part 1 of this small series, we laid the foundations for monitoring the working/room climate in the home office and office with some theory and the installation of IoT sensors. In Part 2 we will now go into the connection to an IoT platform such as the B.One Gallery including data visualization and notifications.
– 📖🕓 ≈ 6 min – As a continuation of our small series of articles on the open source tool Grafana, we would like to show you today, using the free…
– 📖🕓 ≈ 10 min – You have purchased access to the B.One Gallery visualization tool, but are now wondering where exactly you can find what? Our Quick Guide – B.One Gallery provides the answer to this question and gives an overview of the areas and functions of the tool.
– 📖🕓 ≈ 5 min – You can learn a lot about using the B.One Gallery in other blog posts. But you haven’t read them (yet) or are you still wondering what the B.One Gallery actually is? Then this post is just right for you.
In many Internet of Things use cases, it is important or even essential to be informed immediately when certain threshold values/value ranges are exceeded/fallen below or when certain states are reached. This is the only way to react quickly and in time. For this purpose, the B.One Gallery offers you the possibility to set up and manage corresponding notifications, as already mentioned in the articles “Visualization Tool B.One Gallery – An Introduction” and “Quick Guide – B.One Gallery”. Where exactly and how easy it is, we will show you below.
The notification management can be found in the navigation bar at the top of the screen under the tab "Notifications". There you have an overview of all currently active notifications and some other options.
In the sidebar on the left, you will find sorting options for the overview and the option to add new notifications.
On the right side is an overview of your currently configured notifications. Here is an example with two notifications for a ZENNER CO2 indicator and a Sensative Strips sensor:
In this overview you can see, if any have already been created, which device group your notifications are assigned to, which device is being monitored, what is being monitored and on the far right which of the notifications are currently active. Particularly practical: With just one click, you can change the respective status here at any time. For example, to pause a notification that is currently not needed, you simply flip the corresponding switch instead of deleting it completely right away.
Clicking on a notification opens the settings available for it. Here is an example of the notification type “CO2 level”:
Here, the conditions for when the notification occurs can be defined in many different ways. The recipients of the notification can also be entered here. But more on that below.
As mentioned above, you can create a new notification using the “Add Notification” button in the left sidebar:
Clicking on it leads to the following view:
Under point 1 you now first select the type of notification, i.e. which parameter/measured value it should be about. The options that are displayed here depend on which sensors you have previously integrated into your B.One Gallery account.
Under points 2 and 3 you select the building or the device group and optionally a subgroup that contains the devices for which you want to create a notification. Multiple selections are also possible here.
Under point 4 you select the devices to be monitored. The options available to you here depend on the previously selected device and subgroup or subgroups. In order to create a notification directly for several devices that monitor the same parameter, multiple selection is also possible here.
Under "Choose your desired notification" you select whether you only want to be notified when the device or devices stop sending data or when other conditions are met. Here you define the triggers for the alarm/notification, whereby depending on the type previously selected, different options are available to suit the respective purpose. For example, you can set thresholds here or limit the time period when you want to receive a notification and when not.
Finally, you define the desired recipient or recipients. You can choose to send notifications via email or text message (SMS). Sending emails is free of charge, for sending text messages (SMS) an account including credit with the provider 46elks is required. And don't forget: click on "Add Notification" at the bottom.
In case you are still wondering how such a notification actually looks like, here is an example of an email notification for the parameter temperature:
You now know how to set up and manage notifications for certain states or state changes in the B.One Gallery. Questions, suggestions or requests for improvement are as always welcome in the comments. And you can find other helpful articles about the tool in the “B.One Gallery” blog category.
COOKIES: