B.One Gallery Howto: Create & Manage Device Groups
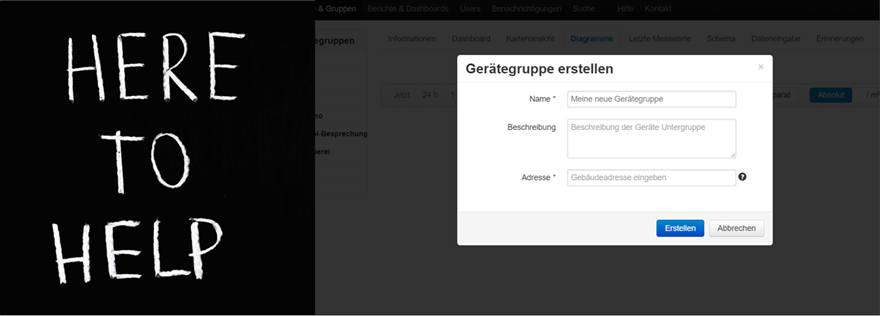
– 📖🕓 ≈ 10 min – You have purchased access to the B.One Gallery visualization tool, but are now wondering where exactly you can find what? Our Quick Guide – B.One Gallery provides the answer to this question and gives an overview of the areas and functions of the tool.
– 📖🕓 ≈ 3 min – In the B.One Gallery, your sensor data is visualized in an appealing way. But is it also possible to export the raw data of your devices? You can find the answer in this post.
– 📖🕓 ≈ 4 min – The B.One Gallery offers the option of setting up notifications for critical status changes in order to be informed immediately. We show you how easy it is.
– 📖🕓 ≈ 4 min – Updated on 01/12/2023 Like me, you already use the B.One Gallery visualization platform in combination with a compatible GPS tracker and would like to receive…
– 📖🕓 ≈ 6 min – This Quick Guide is intended to help you find your way around the B.One Middleware more easily. The following step-by-step instructions explain the views of…
– 📖🕓 ≈ 6 min – Article last updated: 01/31/2022 After I get you in Part 1 and Part 2 of this series of posts showed what you can do about…
Our "Quick Guide - B.One Gallery" gives you a basic overview of the areas and functions of the B.One Gallery. However, in this article we will go into detail on how you can create and manage device groups in your account. What are device groups and how do they benefit you? How do you create a new device group? And what setting/management options do you have within such a group? The answers to all of these questions can be found below.
If you are interested in a specific topic or a specific option/function, simply navigate to the relevant section using the overview below.
You can find the “device groups” in the “Buildings & Groups” area. Here you can see a list of all your devices/sensors linked to the B.One Gallery and manage them. With the help of the groups, devices that belong together can be bundled and evaluated more clearly. For example, you can group all your CO2 or temperature sensors together, i.e. by device type, or all devices installed in a specific building. By selecting devices in the list, you can see the associated data/measurements in the various sub-tabs on the right.
To create a new device group, simply click on the small gear icon on the top left next to the "My buildings and device groups" heading and then click on "Create device group". Now deposit a name, a description (optional) and an address. This information then appears when you select this device group on the right-hand side in the "Information" sub-tab.
Here is an example of creating a new device group in the screencast:
https://community.mz-connect.com/wp-content/uploads/2021/11/2021-11-22-b-one-gallery-geraetegruppe-erstellen.mp4Why do you have to enter an address? This is for the simple reason that new devices get this address as their position in order to be able to locate them more quickly. However, this address can also be changed later for each individual device.
Tip: When you order a GatewayPLUS and sensors with the option ZENNER IoT PLUG&PLAY in the ZENNER Shop, then a first device group will be automatically created for you, to which your sensors are assigned and which you can already see in the overview after your first login (see also article "B.One Gallery Howto: Add sensors"). We explain exactly how you get access to the B.One Gallery in our “Quick Guide – B.One Gallery”.
Once you've created a new device group, you'll have a variety of settings/administration options for it, which we'll detail below:
3.1 Add Device Subgroup
3.2 Add Device
3.3 Add Manual Meter
3.4 Select all Subgroups
3.5 Select all Devices
3.6 Change Device group
3.7 Delete Device Group
To access these options, simply click on the small gear icon to the right of a group's name:
Note: If you are not the owner of a device group, but were only invited/added as a "reader" for example, then all these options are of course not available to you. You can see which role you have in which group either by clicking on the small gear symbol next to zhe group (in the example above "Owner") or bundled in the "Users" area.
Sometimes it is useful to further subdivide a device group. For example, if you have several building units according to which you want to bundle certain devices within a building, or if you want to structure your devices according to different device types. There are "subgroups" for this. To create a new subgroup, simply click on the gear icon on the right next to the desired parent group and then click "Add device subgroup". Now enter a name (mandatory) and a description (optional) for your subgroup.
Here is an example of creating a new subgroup in the screencast:
https://community.mz-connect.com/wp-content/uploads/2021/11/2021-11-22-b-one-gallery-untergruppe-erstellen-3.mp4You've created a subgroup and are now wondering how you can assign your devices to this subgroup? This requires two simple steps:
Here is an example of adding a device to a subgroup in the screencast:
https://community.mz-connect.com/wp-content/uploads/2021/11/2021-11-23-b-one-gallery-geraet-zu-untergruppe-hinzufuegen.mp4This option is basically self-explanatory. This allows you to add new devices to the B.One Gallery. These then appear in the respective device group in which they were created and can optionally be assigned to another subgroup, as explained above in section 3.1.
Here is an example of adding a new device to a device group in the screencast:
https://community.mz-connect.com/wp-content/uploads/2021/11/2021-11-22-b-one-gallery-geraet-hinzufuegen-2.mp4A more detailed step-by-step guide to this can be found in the blog article "B.One Gallery Howto: Add Sensors".
Did you add a device to a subgroup and want to change it again? Simply click on the gear icon next to the device and in this case select the option: "Move to another building or device group".
If required this option gives you the opportunity of adding manual meters to your device group, which cannot yet be read via radio. Once you have done this, you can set appropriate reminders for your manual readings as mentioned in the article “Quick Guide – B.One Gallery” >> (4. Buildings & Groups, tab "Reminders").
Here is an example of adding a manual meter in the screencast:
https://community.mz-connect.com/wp-content/uploads/2021/11/2021-11-22-b-one-gallery-manueller-zaehler-hinzufuegen-1.mp4With the useful function "Select all subgroups", you can quickly select all subgroups of a device group to display the data of all subgroups of a device group (separately or combined depending on the chart type).
With the option “Select all devices”, you can select all devices that are in a device group in order to display their data. In contrast to the "Select all subgroups" option you will not see aggregated values for the complete subgroups, but only for the currently selected devices (also displayed separately or combined).
If required you can change the previously stored information (name, description, address) for your group under the point "Change device group".
This option is actually self-explanatory. If you no longer need a device group, you can easily remove it from your account via the "Delete device group" option. Please note: There is no way you can restore this or the data previously contained afterwards. The devices in this group will also be deleted and need to be added to the gallery again if desired (an exception is the removal of a subgroup). But don't worry, you have to confirm the command before the group is deleted.
So now you know what the device groups in the B.One Gallery are all about, how you can create and manage them and what the benefits are. Do you have any questions or suggestions/requests for improvement? Then we look forward to your comments :-)
PS: You can find more articles about the visualization tool in our blog section “B.One Gallery”.
COOKIES: