B.One Gallery Howto: Add Sensors
Last modified on 11th April, 2024
This how-to is intended to help you create your own sensors in the B.One Gallery using these step-by-step instructions.
PS: If this is too complicated for you, then simply buy a GatewayPLUS with the ZENNER IoT PLUG&PLAY option (this gives you the right to use the B.One Gallery with you. Kauft dann einen Sensor ebenfalls mit der ZENNER IoT PLUG&PLAY Option im ZENNER Shop. Then the ZENNER Shop Team will take care of the system for you on the network and in your B.One Gallery .
For other LoRaWAN sensors without the ZENNER IoT PLUG&PLAY option, you can find the instructions here.
1. Login / Register
In order to be able to use the B.One Gallery , you must first register. Please note the terms of use when registering, the use of the software is not free of charge. You need a license to use it. You received this with the purchase of a ZENNER IoT GatewayPLUS, whether Indoor, Outdoor or SMART. When you bought it, you were also told how long it would be used and for how many devices. Or you have received such a right of use as part of a project contract. Of course you’re welcome to look around a bit, but you can’t do much in the gallery without a gateway, network and sensors. Therefore, the easiest way is to buy a GW with network use in the ZENNER Shop IoT Sensors & Solutions with the ZENNER IoT PLUG&PLAY option.
If you have purchased a GW Plus, you have already received an invitation email. Please register here as well. You will then already see your own ‘Folder’ (more on this below) with your customer number.
If you have already bought devices with the PLUG&PLAY option, you will find them both online and in the gallery, where they appear in your “customer folder” in the left navigation.
2. Sensor Data & ZENNER Datahub User Data
You need your access data for the ZENNER Datahub, i.e. your user name (user ID) and your password! If you bought a ZENNER IoT GWPlus, you received both in an email from the ZENNER Shop Team.
Make sure you have the following from the sensor ready:
– Device EUI (short: DevEUI)
– Application ID (short: AppKey) → only if the sensor still needs to be initially created in the ZENNER Datahub
– Access / Join KEY (short: JoinEUI) → only if the sensor still needs to be initially created in the ZENNER Datahub
And from the ZENNER Datahub you need:
– your User Name (User ID)
– your Password
– the Name of your Tenant (also included in the received Email)
3. Add the Sensor
Ok but now from the beginning. You have a sensor and want to set it up yourself for the first time.
Move the mouse pointer to your customer folder on the right until a small steering wheel appears

Click on the small steering wheel

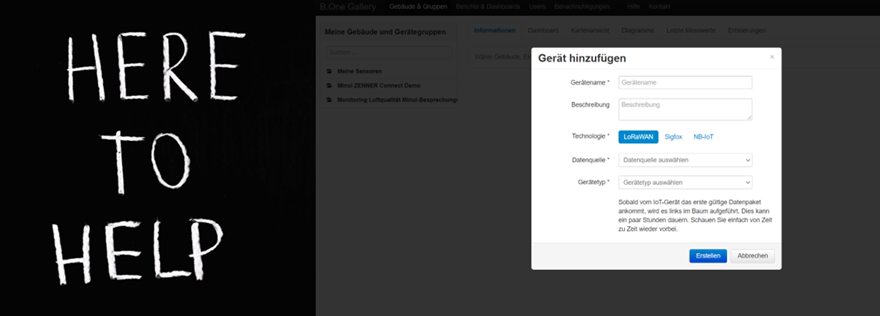
Choose Add Device

FIRST CHECK whether the SENSOR you want to create is actually available in the list of currently almost 90 sensors by looking at the list under device type. Is he in? Class! Then select in (if not then the sensor is not supported yet).
! All ELSYS sensors (ERS, ELT, EMS) are summarized in a selection !

Give your sensor a meaningful name and, if you like, a description of what and where you installed it. Choose LoRaWAN.
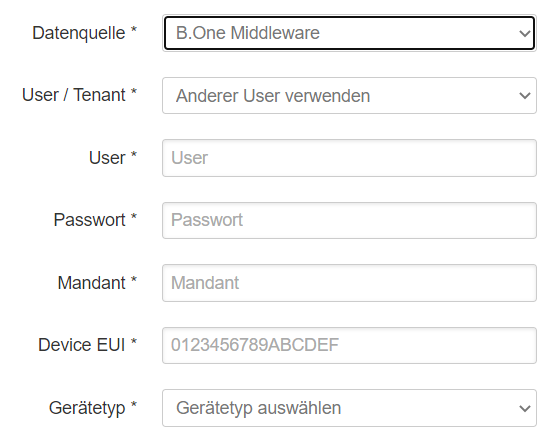
Select ZENNER Datahub / B.One Middleware from the list of data sources.
Enter your ZENNER Datahub user name and password as well as the tenant name.
IMPORTANT! You cannot add a sensor to your network or to the B.One Gallery without this data!
Depending on whether your sensor has already been created in the ZENNER Datahub / B.One Middleware for publication on the network or not, you either only need to enter the DevEUI of the sensor mentioned above or, subsequently, also the JoinEUI and the AppKey.
For some sensors, you also have to provide additional information, e.g. B. whether indoor or outdoor or in the case of level sensors also the distances from the sensor in cm for full and for empty. But you can also adjust this later when you have installed the sensor.
Don’t forget to press the “Create” button at the bottom!
As soon as the first valid data packet has been received from your sensor, it will be listed under your devices in the navigation on the left. Depending on the sensor, this can sometimes take a few hours. Just check back from time to time.
A little tip: notifications for a sensor can only be set up once a first data packet has been received.
Good luck! Actually it should work pretty easy 🙂
For a more detailed overview of how you can create and manage your own device groups and other subgroups in the B.One Gallery , I recommend the article “B.One Gallery Howto: Create & Manage Device Groups“.
Recommend0 recommendationsPublished in B.One Gallery, Operating Aids


Responses